reader comments
89 with 49 posters participating
-
A Falcon 9 rocket launched into space on Monday morning.Trevor Mahlmann
-
Nine Merlin engines all firing at once.Trevor Mahlmann
-
The weather was fine in Florida.Trevor Mahlmann
-
This was the fourth time this rocket’s first stage has flown.Trevor Mahlmann for Ars
-
It was a pleasant November morning in Florida.Trevor Mahlmann
-
The Falcon 9 rocket is seen on Sunday, before going vertical at Space Launch Complex 40 in Florida.Trevor Mahlmann for Ars
-
Here’s a close-up shot of the payload fairing.Trevor Mahlmann for Ars
-
The stack of 60 Starlink satellites for Monday’s flight.SpaceX
-
This first stage has previously flown three times.Trevor Mahlmann for Ars
-
This was the first time SpaceX has flown a first stage four times.Trevor Mahlmann for Ars
At the start of the week, SpaceX launched its first 60 operational Starlink satellites—the company’s 50th consecutive successful launch. And as innovative as this communication network’s entire concept might be, many onlookers are curious for a much simpler reason.
You want to view—maybe even photograph—these things in the pre-dawn, post-sunset, or night sky, right? Well, you’ve come to the right place.
First, you’ll want to be quick. Since separating from the upper stage on November 11 at about 11am Eastern Standard Time (Nov. 11, 16:00 UTC) and with each hour that passes, the satellites have been spreading out by individually raising their orbits to the correct height. And after a while, they will be on their own instead of appearing in this initially clustered formation.
At this point in the week, you still have a few options to try to find SpaceX’s satellites overhead in the skies. You’re only going to be able to see them ~30 minutes or earlier before sunrise, ~30 minutes or later after sunset, or at night when the sky is dark enough or the Sun is below your local horizon yet still illuminating these devices, since they are at a much higher altitude.
To help find the satellites within these limited windows, luckily, there are a few good resources available online.
Heavens-Above.com (free)
Heavens-Above’s strength lies in its sky charts. If you’re intending to only view Starlink’s passes (not photograph it), this is the one site you want to use since Heavens-Above is the easiest. The step-by-step process looks like this:
- Go to Heavens-Above.com and make a free account.
- Set your location to where you would like to view the Starlink satellites.
- From the homepage, there is a “Starlink Launch 2” under the “10-day predictions for satellites of special interest” section midway down the left side of the page. Click on that.
- The page “Starlink Launch 2” directs you to a list of the upcoming visible passes listed in a 24 hour time format. (So, remember, 21:46 = 9:46pm your local time.)
This particular page also shows you things like “start time,” “highest point” and “end point.” Here’s how Heavens-Above defines those:
Start time: the time and compass direction (north, south, east, west) that the satellites rise above your local horizon or emerge from the Earth’s shadow (no longer illuminated by the Sun).
Highest point: the time and direction the satellites will be highest above your local horizon.
End point: the time and direction the satellites will enter into the Earth’s shadow or set (like a sunset) below your local horizon.
One tip if you’re using this method: if you do not see any upcoming passes, try selecting “All” instead of “visible only” and see if there are any within 20-30 minutes of your local sunset. For example, if your local sunset is 4:34pm (16:34) and it shows a pass at 4:55pm (16:55), it will be difficult to photograph the satellites because the sky is still so bright, but you should still be able to see them with your naked eye.
CalSky.com (free)
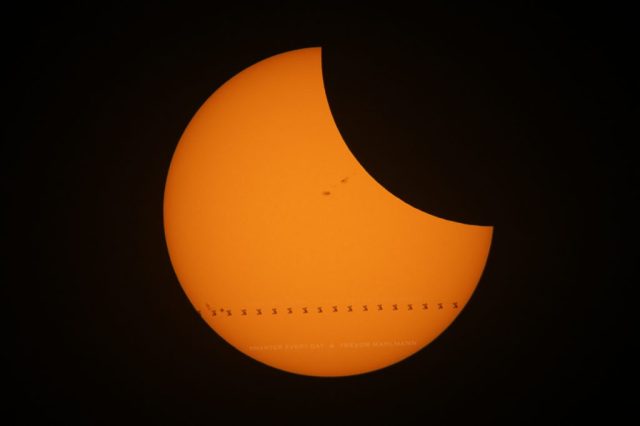
A second freely available tool is a website called CalSky.com (account not required, but recommended). CalSky allows you to predict not only upcoming Starlink passes, but it also tracks things like solar/lunar transits and more interstellar points of interest. For instance, CalSky was a big part of the preparation for Destin Sandlin from Smarter Every Day, and I used this tool to capture the solar eclipse and ISS transit back in August of 2017:

If opting for CalSky to help locate Starlink satellites, the process looks like this:
-
- Go to CalSky.com.
- Start by setting your location here. (You can view Starlink without making an account, but I would recommend it so you can save a location for later use).
- Here is a link to the viewing opportunities for the “Starlink Trail” after you’ve set your location.
- Select your duration at the top of the page for the amount of time you would like to see future fly-by’s. (I usually select ‘3-6 Days.’)
- Check the following boxes (you can utilize others like transits/close encounters later on, but for the sole purpose of viewing use these) “Show satellite passes” and “Satellite must be illuminated.”
- Scroll back up to the top and click “GO” again to refresh.
- Scrolling down, you’ll see a list of the upcoming passes of the Starlink constellation.
- If you are confused by the 24-hour time format, it’s just like before (say: “21:36:42” for example simply means 9:36:42pm; 12 + 9 = 21). Unlike Heavens-Above, there is an option here to switch to the 12-hour formatting located on the page where you set your location.
FlightClub is primarily for rocket launch visualizations, simulations, and photography mission planning, but it’s useful for planning to view or photograph the Starlink cluster of satellites via what are called TLEs (two-line orbital elements). This tool allows you to enter GPS coordinates and camera/lens information, then pan around to experiment with what millimeter focal length would be the best from your location.
For example, below is a visualization of what a photo would look like of a previous Starlink pass with a full-frame camera and an 11mm lens from Chicago, Illinois (looking SSE).
-
What a previous Starlink pass would’ve looked like using a full frame camera and an 11mm lens from Chicago, Illinois (looking SSE).Trevor Mahlmann / FlightClub.io
-
Here’s one with a 50mm lens, same setup and location.Trevor Mahlmann / FlightClub.io
-
The mobile version of FlightClub.io is useful, too (we’ll get to that, with these points of emphasis explained).Trevor Mahlmann / FlightClub.io
As noted before, this is a paid option, but if you’re serious about photographing Starlink or rocket launches in the future, I’d recommend it. You can also become a $10 / Geostationary Transfer Orbit level Patron of Declan Murphy’s, and this tier gets you access to the Photog Tools (which produced the 3D Viewer screenshots above).
However you choose to sign up for access, here are the basic steps to utilize Flight Club:
-
- Go to FlightClub.io homepage (if the page doesn’t automatically redirect you), and in the upper right, click your profile photo.
- Find the “Favorite Locations” tab and add a few locations where you might be photographing/viewing at (i.e. home, a nearby dark sky park, etc). Note that it’s probably easiest to open Google Maps and find decimal GPS coordinates there by searching for your city and clicking on the map where you want to watch/photograph from.
- Click “Visualize Trajectories,” then the hamburger menu in the upper left. Here, you will find all the customization options. The ones we will be using today are: photo equipment, location, and Import TLEs.
- Set your photo equipment to the camera and lens you plan to use, then click “Set.” The field-of-view will snap to that view.
- Navigate to “Set your planned location,” and in the “Favorite Locations” dropdown, select the one you would like to use that you added earlier. Use an elevation of 25 meters, then click “Set” again. FlightClub will now zoom to your planned location. (Wait a few seconds if it sets you below ground, by the way, as FlightClub will auto snap you up to ground level at those GPS coordinates within a few seconds.)
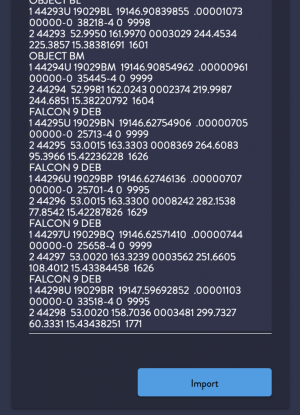
- Now it’s time for the TLEs (two-line orbital element sets). Navigate here on CalSky to get the details, then paste the TLE info you’ve just copied into the “Import TLEs” section of FlightClub. Click “Import” to finalize it. It should look roughly like the screenshot to the right.
From here, it’s time to re-use the CalSky or Heavens-Above portion of the tutorial and determine a good pass for your location.

To do this, start by using the time scrubber in the lower left of FlightClub’s 3D viewer to navigate to your time in UTC and begin planning your photo or viewing session in 3D. Since your camera is 25 meters in the air, you can pan around and use landmarks on the ground to orient yourself, better understand the CalSky map, and determine where the pass will be in the sky in order to point your eyes and the camera.
For one final tip, I’d recommend pulling up the TLE webpage from before in your mobile Web browser and again copying the entire webpage of data. That way, once you’re at your viewing location, you can pull up FlightClub.io and follow the same steps as above if needed. You can click the little “⏰” icon above the time scrubber (whether in mobile or desktop) to jump to the current time and play in real-time on your phone or tablet. Use the same location as before, but in the field for visual (non photographic) aid, select “full frame” for the camera and type “24” in the “focal length (mm)” box this time. When used on your phone or tablet device, these settings aid you in finding the satellites in the sky in real time.
Hopefully, these aids can help any fellow aspiring space photographers locate their satellite specimens this week for practice. After all, this latest launch will be far from the only time you can attempt some Starlink sighting—SpaceX has said it wants to deploy a minimum of 800 satellites before offering commercial service in 2020 or 2021. And the only thing a few errant photographs of the sky will temporarily cost you is SD card space.
An earlier version of this guide appeared on TMahlmann.com. Good luck with viewing and photographing this week, and feel free to hit Trevor up on Twitter or in the comments if you still have questions.
Listing image by Trevor Mahlmann / FlightClub.io


